
Building a mini truck is an art form, but if you don’t get the “low” right, your dream ride can quickly become a back-breaking nightmare. Whether you’re aiming for a mild drop or trying to drag spark on the interstate, doing it correctly is the difference between a head-turner and a hazard.
Here is the breakdown of how to drop your mini truck the right way.
The Anatomy of the Drop
1. When to Swap Spindles
Drop Spindles are the “holy grail” of front-end lowering. They move the wheel pin higher up on the spindle body, which raises the wheel relative to the rest of the suspension.
- The Big Do: Use these if you want to lower the front 2-3 inches without changing your suspension geometry.
- The Benefit: Since you aren’t compressing the spring to get the look, you keep your factory ride quality and alignment specs.
- The Don’t: Don’t buy “no-name” spindles. This is a critical structural component; stick to reputable brands like Belltech or McGaughys.
2. Shocks and Springs: Do They Really Matter?
In a word: Absolutely. * Springs: Lowering springs are stiffer to prevent you from bottoming out now that you have less suspension travel.
- Shocks: This is where most people mess up. If you lower a truck 4 inches but keep factory-length shocks, the shock will be “bottomed out” internally at a standstill. You need short-ratio shocks designed for lowered applications to actually dampen the bumps.
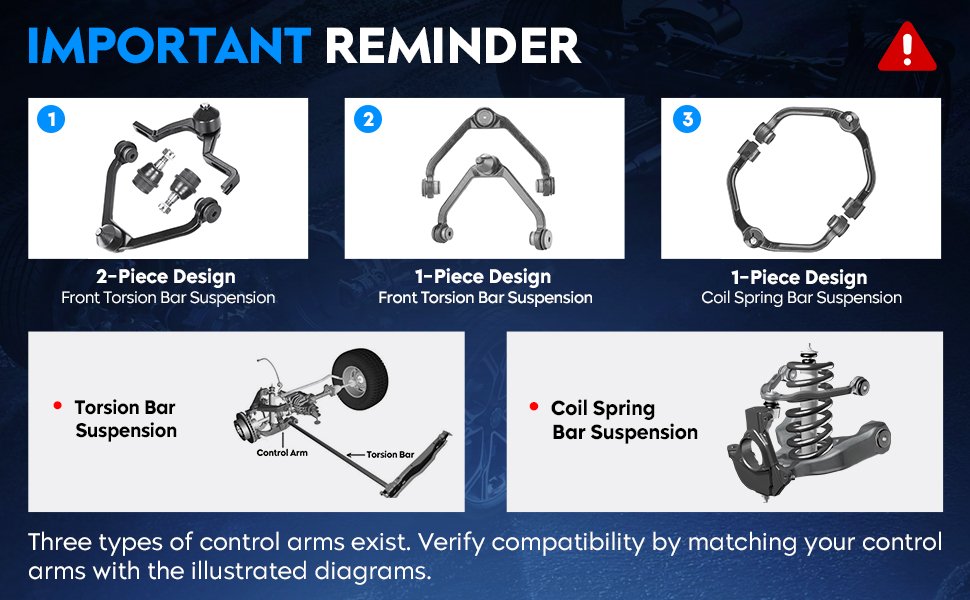
3. Understanding Torsion Bars
If you’re working on an older Chevy LUV, an S10 4×4, or many Toyota/Nissan minis, you might not have coil springs at all. You have Torsion Bars.
- These are long steel rods that act as your springs by twisting under pressure.
- The “Cheap” Way: You can “crank down” the adjustment bolts to lower the truck for free.
- The Right Way: Use re-indexed lowering keys. This allows you to achieve the drop while keeping some tension on the bar so your ride doesn’t become a bouncy, uncontrollable mess.
What is a C-Notch? (And why you need one)
When you lower the rear of a truck, the axle gets closer to the frame. Eventually, you’ll hit a bump and the axle will slam into the frame rail. This is “bottoming out,” and it feels like a sledgehammer hitting your seat.
A C-Notch is a reinforcement kit that requires cutting a semi-circle out of the frame above the axle to give it “room to breathe” (travel).
- Under 4″ Drop: You can usually get away without one, though you’ll want thinner bump stops.
- Over 4″ Drop: A C-Notch is mandatory.
- The Do: Always weld or grade-8 bolt your notch plates securely. The frame is the backbone of your truck; don’t compromise it with sloppy cuts.
T
| Component | The “Do” | The “Don’t” |
| Coil Springs | Use proper lowering springs. | Never heat your springs with a torch to sag them. |
| Leaf Springs | Use lowering blocks (up to 3″) or de-arched leaves. | Don’t stack multiple blocks; it leads to axle wrap. |
| Spindles | Use for the first 2″ of drop to save your tires. | Don’t forget to check wheel clearance (some require 17″+ rims). |
| Alignment | Get an alignment immediately after any drop. | Don’t assume it “looks straight enough” to drive long-term. |
The Golden Rule: If it’s worth doing, it’s worth doing with the right parts. Your spine (and your truck) will thank you.
Understanding Torsion Bars and Keys for Lowering a Mazda Mini Truck
Hey Johnny, since you’re in Atlanta and diving into lowriding mini trucks like the Mazda B-series (think B2000 or B2200, which are popular for this), I’ll break this down simply for beginners. Lowriding mini trucks is all about getting that slammed look while keeping it drivable—nothing too technical here. We’ll cover what a torsion bar and torsion key are, how they work for lowering the front end, and I’ll include visuals like an exploded view diagram to make it clear. Note: Mazda B-series trucks share suspension with Ford Rangers, so a lot of info applies to both. Always get an alignment after adjustments, and if you’re new, have a buddy or shop help to avoid messing up your ride.
What is a Torsion Bar?
Think of a torsion bar as a long, straight metal rod that acts like a spring for your truck’s front suspension. Instead of bouncing up and down like a coil spring (the curly ones you see on some cars), it twists to absorb bumps and support the truck’s weight. In Mazda mini trucks from the ’80s-’90s, the torsion bars run from the lower control arm (the part connected to your wheel) back to a crossmember under the cab. When the wheel hits a pothole, the bar twists to smooth it out. It’s a simple, tough setup that’s great for lowriding because you can adjust it easily without swapping parts.
What is a Torsion Key?
The torsion key (sometimes just called the “key”) is the adjustable piece where the back end of the torsion bar plugs in. It’s a hexagonal (six-sided) metal block that fits into the torsion bar’s splined end like a puzzle piece. There’s a bolt attached to it that you turn to change the bar’s tension—cranking it up tightens the bar for more height (like lifting), and loosening it reduces tension to drop the front end lower.
Why’s it key for lowriding? It lets you fine-tune your stance without cutting or welding. But beginners watch out: Just cranking it down can make the ride stiff and bouncy because it reduces suspension travel. A better way (called re-indexing) is to remove the bar, rotate the key a few splines (those grooves), and reinstall it. This keeps the ride smoother while getting you low.
This diagram shows a basic torsion bar setup (left) compared to a coil spring (right). See how the bar connects the control arm to the chassis? That’s where the key sits at the chassis end.
How to Lower Your Mazda Mini Truck Using Torsion Bars (Beginner Steps)
Lowering the front on these trucks is straightforward and cheap—often just tools you have at home. Aim for 2-4 inches drop to keep it street-friendly. The rear usually needs lowering blocks (U-shaped spacers under the leaf springs), but we’re focusing on the front torsion bars here. This is for a static drop (no air bags or hydraulics yet).
- Prep Your Truck: Park on level ground, jack up the front, and support it with jack stands. Remove the front wheels for access. Measure your current ride height (from ground to fender) so you can track the drop.
- Locate the Torsion Bar and Key: Under the truck, find the long rod (torsion bar) running along the frame. At the rear end, it’s inserted into the torsion key, which has an adjuster bolt (usually 18-24mm). There’s a lock nut on it—loosen that first.
- Simple Crank Method (Quick but Not Ideal for Ride Quality):
- Turn the adjuster bolt counterclockwise (loosen) a few turns to reduce tension. Each full turn might drop you about 1/2 inch—test drive and adjust.
- Tighten the lock nut back up.
- Warning: Don’t go too low or you’ll bottom out on bumps.
- Better Re-Indexing Method (For Smoother Ride):
- Mark the torsion bar’s position with paint where it meets the key and control arm.
- Unload the suspension: Use a torsion bar unloading tool (cheap rental from auto parts store) to safely release tension without the bar snapping.
- Pull the bar out from the key (it might need some hammering or prying).
- Rotate the key 2-3 splines clockwise (for lowering) and reinsert the bar.
- Re-tension the bolt to factory specs (check your truck’s manual—around 50-70 ft-lbs).
- This repositions everything without over-stressing the bar.
- Reassemble and Test: Put wheels back on, lower the truck, and bounce it to settle. Get an alignment ASAP to avoid tire wear.
For the rear: Install 3-5 inch lowering blocks between the axle and leaf springs, with longer U-bolts. It’s even easier—about 30 minutes per side.